Mastering Worbla Armor: 2025 Heat Forming & Painting Guide
Mastering Worbla armor involves understanding its thermoplastic properties for precise heat forming, coupled with advanced painting techniques to achieve realistic textures and durable finishes, essential for high-quality cosplay in 2025.
Embarking on the journey of creating stunning cosplay armor requires a material that is both versatile and forgiving. Mastering Worbla Armor: A 2025 Guide to Heat Forming and Painting Techniques for Durable Cosplay delves into the intricacies of working with this exceptional thermoplastic, offering insights that transcend basic crafting. This guide aims to equip cosplayers, from novices to seasoned veterans, with the knowledge to sculpt, mold, and finish Worbla pieces that stand out for their detail, authenticity, and resilience.
understanding worbla: the foundation of durable cosplay
Worbla, a revolutionary-thermoplastic material, has transformed the world of cosplay and prop making. Its unique heat-activated properties allow for intricate shaping and molding, making it a favorite among crafters seeking both flexibility and durability. Understanding the different types of Worbla available and their specific applications is the first step towards mastering this medium. Each variant offers distinct advantages, from varying levels of elasticity to different surface finishes and adhesive properties. For instance, Worbla’s Finest Art is renowned for its smooth finish and ease of manipulation, while Worbla’s Black Art offers a darker base, saving on priming time for certain projects.
The material’s composition, typically a blend of thermoplastic with wood pulp or similar fibers, provides it with exceptional strength once cooled. This strength translates directly into the longevity of your cosplay pieces, offering resistance against impacts and wear often encountered at conventions and photo shoots. Furthermore, Worbla’s scraps are fully re-workable, minimizing waste and making it an environmentally conscious choice for crafters. This reusability not only saves on material costs but also encourages experimentation without fear of irreversible mistakes.
choosing the right worbla for your project
Selecting the appropriate Worbla type is crucial for your project’s success. Consider the complexity of the shapes, the desired finish, and the overall structural integrity required.
- Worbla’s Finest Art: Ideal for detailed sculpting and smooth surfaces, it activates at lower temperatures.
- Worbla’s Black Art: Offers a smoother finish, darker base, and often requires less priming, perfect for darker armor pieces.
- Worbla’s Mesh Art: Reinforced with a mesh, it’s excellent for structural components requiring high strength and impact resistance.
- Worbla’s TranspArt: A clear thermoplastic, it’s used for translucent effects like magic spells, visors, or glowing elements.
Beyond the type, consider the thickness. Thicker Worbla sheets provide more rigidity but require more heat and effort to shape, while thinner sheets are more pliable for delicate details. The choice often depends on the scale and function of the armor piece. For instance, a breastplate might demand a thicker grade, whereas intricate filigree or trim could benefit from something thinner and more flexible. This strategic selection forms the bedrock of a robust and aesthetically pleasing armor creation.
The longevity and aesthetic appeal of your cosplay armor hinge significantly on the initial choices made regarding materials and techniques. Worbla, with its inherent versatility and robustness, provides an excellent canvas for bringing complex designs to life. By understanding its properties and selecting the right variant, you set a strong foundation for the subsequent stages of heat forming and painting, ensuring your finished piece is as durable as it is visually striking. The ability to reheat and reshape also means that adjustments can be made even after the initial forming, offering a degree of flexibility that other materials might not.
mastering heat forming: precision and technique
Heat forming Worbla is an art that requires patience, practice, and precise temperature control. The material becomes pliable when heated, allowing crafters to sculpt it into virtually any shape. This malleability is where Worbla truly shines, enabling the creation of custom-fitted armor that conforms perfectly to the wearer’s body. The primary tools for heat forming include a heat gun, heat-resistant gloves, and various sculpting tools. Safety, such as working in a well-ventilated area, is paramount when using a heat gun.
The technique involves applying even heat across the sheet of Worbla until it becomes soft and rubbery. It’s crucial not to overheat the material, as this can cause bubbling or make it excessively sticky and difficult to manage. Once pliable, the Worbla can be draped over forms, molded around body parts (with proper protection and quick action), or sculpted freehand. The key to smooth, seamless surfaces is gentle and consistent manipulation, avoiding sharp creases or uneven stretches. For curved pieces, using a mold or a positive form, such as a mannequin or a custom-made buck, can ensure symmetry and a professional finish.
essential tools and safety for heat forming
Proper tools and safety measures are non-negotiable for effective Worbla crafting. Equipping yourself correctly protects you and enhances your results.
- Heat Gun with Variable Temperature Control: Allows for precise heating, preventing overheating or under-softening.
- Heat-Resistant Gloves: Protect hands from burns and allow for direct manipulation of hot Worbla.
- Sculpting Tools: Various-sized ball tools, spatulas, and wooden dowels are useful for detail work and smoothing.
- Work Surface Protection: A non-stick mat or silicone baking sheet prevents Worbla from adhering to your workspace.
Layering Worbla is another advanced technique that adds strength and dimension to armor pieces. By applying multiple layers, especially with Worbla’s Finest Art or Black Art, you can create intricate raised details, reinforce stress points, or build up a thicker base for additional stability. When layering, heat both pieces until tacky, press them firmly together, and then re-heat and smooth out any seams. This process creates a single, unified piece that is significantly stronger than a single layer. The ability to layer also opens up possibilities for complex mechanical designs or armor with integrated features.
For creating sharp edges or complex details, often referred to as “score and fold” or “pleating,” allow the Worbla to cool slightly after heating. This partial cooling provides enough rigidity to hold a sharp edge when folded or pressed against another surface. Practicing these techniques on scrap pieces before working on your main project can save time and materials, ensuring you develop a feel for the material’s working properties. Remember, Worbla is forgiving, so if you’re unhappy with a shape, simply reheat and try again. This iterative process is part of the learning curve and contributes to the mastery of the material.
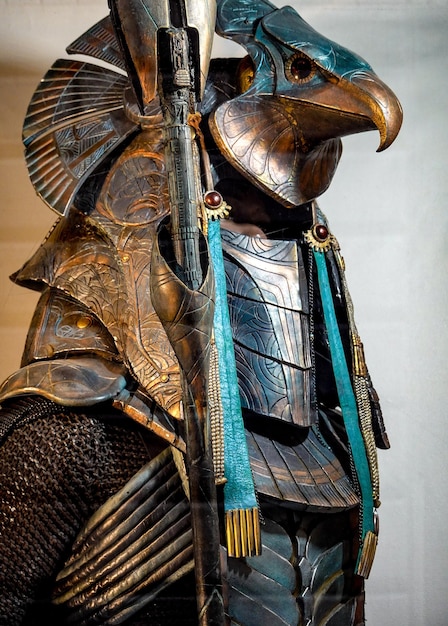
sculpting and detailing: bringing armor to life
Beyond basic shaping, Worbla excels in its capacity for sculpting intricate details, thereby elevating a simple armor piece into a true work of art. This stage is where your creative vision truly takes form, adding depth, texture, and character to your cosplay. Techniques range from delicate appliqué work to complex raised reliefs, all contributing to the final aesthetic. The ability of Worbla to bond to itself when heated makes adding layers and creating dimension incredibly straightforward.
One of the most effective ways to add detail is through layering thin strips or cutout shapes of Worbla onto a base piece. By heating both the base and the detail until tacky, then carefully pressing them together and smoothing the edges, you can create seamless raised designs. This method is perfect for borders, insignias, or geometric patterns. For more organic or sculptural details, such as leather textures, scars, or ornate carvings, working with small, warmed pieces of Worbla and shaping them with sculpting tools allows for precise control.
advanced detailing techniques for Worbla armor
Taking your Worbla armor to the next level involves mastering a few advanced detailing methods. These techniques add realism and complexity.
- Texturing with Tools: Use various tools (stippling brushes, sandpaper, carving tools) to create wood grain, hammered metal, or battle-damaged effects before the Worbla fully cools.
- Creating Bevels and Edges: Skillfully cut and shape edges after heating, or layer thin strips along the edges for a clean, professional look.
- Adding Gems and Inlays: Embed beads, cabochons, or pieces of TranspArt directly into hot Worbla for seamless integration.
For complex, multi-layered details, consider creating templates from paper or foam first. This allows you to refine your design before committing to Worbla, ensuring that all pieces fit together perfectly. Once the Worbla is cut according to your template, heat it and apply it to the base, focusing on achieving smooth transitions and tight seams. Small gaps can often be filled with Worbla scraps, reheated, and blended in. This meticulous approach to detailing is what distinguishes a good cosplay from an exceptional one, demonstrating a true understanding of the material’s potential and your own artistic skill.
Furthermore, integrating other materials, such as EVA foam or craft foam, with Worbla can expand your detailing possibilities. For instance, using foam as a core structure for large, bulky details and then wrapping it in Worbla provides a lightweight yet durable result. The Worbla adheres to the foam when heated, creating a strong bond. This hybrid approach enables crafters to achieve unique textures and shapes that might be challenging with Worbla alone. Experimentation with these mixed-media techniques can lead to innovative solutions and truly outstanding armor pieces.
priming for perfection: preparing for paint
The transition from a raw Worbla sculpt to a paint-ready piece is a critical stage that significantly impacts the final aesthetic and durability of your cosplay armor. Worbla, while versatile, has a slightly textured surface that, if not properly prepped, can lead to a less than ideal paint finish. Priming isn’t just about color; it’s about creating a smooth, uniform base that allows paint to adhere effectively and show its true vibrancy. Skipping this step can result in uneven color, chipping, or a visible Worbla texture beneath the paint layers.
The granular texture of Worbla’s Finest Art, for example, requires several layers of primer and sanding to achieve a truly smooth surface suitable for a high-gloss or metallic finish. Worbla’s Black Art, with its smoother base, often needs fewer priming layers, which can save considerable time. The choice of primer is also crucial. Flexible primers or those designed for plastics are generally preferred, as they are less likely to crack or peel as the Worbla flexes minimally during wear. Automotive primers or FLEXBOND are popular choices in the cosplay community due to their durability and excellent adhesion.
step-by-step priming process
Achieving a flawless paint job starts with a meticulous priming routine. Each step builds upon the last for optimal results.
- Clean Your Worbla: Ensure the surface is free of dust, oils, or residues using a damp cloth or rubbing alcohol.
- Apply First Primer Coat: Lightly spray or brush on the first primer layer. Allow it to dry completely.
- Sand Smooth: Using fine-grit sandpaper (220-400 grit), gently sand the surface to remove any texture. Wipe off dust.
- Repeat: Apply 2-4 more coats of primer, sanding lightly between each coat, until the desired smoothness is achieved. Focus on building up a consistent, even layer.
After the final layer of primer, inspect your piece under good lighting to check for imperfections, missed spots, or areas that require additional smoothing. Any flaws at this stage will be magnified once the topcoat of paint is applied. This meticulous attention to detail during priming sets the foundation for a professional-grade finish. It’s often helpful to prime in a contrasting color to your Worbla, making it easier to see where the primer has been applied evenly and where it needs more attention. For instance, priming black Worbla with a grey primer makes any missed spots obvious.
The patience invested in the priming stage pays dividends in the final appearance and longevity of your armor. A well-primed surface not only looks better but also protects the Worbla underneath, resisting scuffs and environmental factors. Think of priming as the unsung hero of your cosplay, the essential groundwork that allows your artistic painting skills to truly shine. It’s a foundational step that cannot be rushed, ensuring that every subsequent layer of paint contributes to the overall masterpiece.
painting techniques: achieving realistic textures
Once primed to perfection, your Worbla armor piece becomes a canvas awaiting transformation. Painting is where the armor truly comes alive, gaining depth, realism, and character. Achieving realistic textures, whether it’s the cold gleam of metal, the aged look of worn leather, or the gritty appearance of battle damage, requires a combination of color theory, precise application, and a bit of artistic flair. Airbrushing, hand painting, and dry brushing are among the most common techniques employed to bring these textures to life.
For metallic finishes, a multi-layered approach is often most effective. Start with a solid base coat of metallic paint, then use darker shades in recesses and lighter shades on raised areas to create depth and highlight contours. Weathering techniques, such as applying thin washes of dark paint into crevices and wiping away the excess, can simulate dirt and grime, adding to the realism. For a “used” or “battle-damaged” look, sponge on black or brown paint in areas that would naturally accumulate wear, mimicking chipped paint or exposed raw metal.
specialized painting effects
Beyond basic colors, several specialized painting techniques can elevate your Worbla armor. These methods add character and authenticity.
- Rust and Corrosion: Apply a base color, then layer red-browns and oranges with a sponge, finishing with a matte clear coat.
- Wood Grain: Paint a base wood color, then use a stiffer brush or wood grain tool with a darker shade to drag lines mimicking natural grain.
- Magical Glow: Use iridescent or fluorescent paints over a white base coat, applying lighter shades towards the center of the glow and fading softly outwards.
Another powerful technique is dry brushing. This involves applying a very small amount of paint to a dry brush, then lightly sweeping it over raised details. This catches the edges and highlights the textures that you’ve sculpted into the Worbla, creating impressive contrast and depth. It’s particularly effective for accentuating filigree, rivets, or sharp edges. The choice of paint—acrylics, enamels, or specialty cosplay paints—will also influence the final look, with each offering different drying times, finishes, and durability. Experimentation with various paints and techniques on scrap Worbla pieces is highly recommended to refine your approach.
Lastly, consider the concept of “storytelling through paint.” Every scratch, every stain, every subtle gradient of color can tell a part of your character’s history. A pristine, polished armor tells a different story than a scuffed, dented one. By deliberately applying these effects, you imbue your cosplay with a narrative, making it more engaging and believable. This artistic stage is not just about covering the Worbla; it’s about breathing life into your creation, making it truly unique.
sealing and durability: protecting your creation
The final, yet often overlooked, step in creating a durable Worbla armor piece is sealing. After all the meticulous shaping, detailing, and painting, protecting your hard work is paramount. A good sealant not only preserves the paint job from scuffs, scratches, and environmental wear but also often enhances the overall finish, whether you’re aiming for a matte, satin, or glossy look. Without proper sealing, even the most expertly painted armor is susceptible to damage, especially during the rigors of conventions or photo shoots.
Clear coats come in various formulations, each offering distinct advantages. Acrylic clear coats are a popular choice due to their versatility, quick drying time, and relatively low toxicity. They are available in spray cans for even application or brush-on formulas for more controlled use. For maximum durability, especially for pieces that will experience a lot of handling, consider a two-part epoxy or urethane clear coat. These offer superior resistance to abrasion and impact, though they require careful mixing and application in a well-ventilated area due to their stronger fumes.
applying clear coats for maximum protection
Proper application of clear coats ensures your armor remains pristine. Follow these steps for the best results.
- Ensure Paint is Fully Cured: Wait at least 24-48 hours after your final paint layer to ensure it’s completely dry before sealing.
- Work in a Clean, Well-Ventilated Area: This prevents dust particles from sticking to the wet sealant and protects your health.
- Apply Thin, Even Coats: Multiple thin layers are better than one thick coat, preventing drips, runs, and uneven drying.
- Allow Adequate Drying Time: Follow the manufacturer’s recommendations between coats and before handling the finished piece.
An often-underestimated aspect of durability is the flexibility of the sealant. Worbla, though rigid when cooled, can still experience slight flexing, especially in areas around joints or high-movement points. Using a sealant with some inherent flexibility will prevent cracking or delamination of the clear coat over time. Many acrylic clear coats designed for outdoor use or automotive applications possess this desired flexibility. Testing your chosen sealant on a scrap piece of painted Worbla before applying it to your final armor is always a wise precaution.
Beyond protecting the paint, sealants also play a crucial role in the long-term integrity of the Worbla itself. While Worbla is naturally durable, a protective topcoat can shield it from UV degradation if the armor is exposed to sunlight for extended periods, and can also make cleaning easier. A sealed surface is generally less porous and hand-friendly than unsealed paint, making it more resistant to oils from skin or incidental spills. This final protective barrier ensures your artistic endeavor stands the test of time, proudly showcased for years to come.
maintenance and repair: preserving your cosplay investment
The journey with your Worbla armor doesn’t end after the final clear coat. Like any valuable investment, your cosplay pieces require ongoing maintenance and occasional repair to preserve their pristine condition and extend their lifespan. Proper care ensures that your armor remains a dazzling representation of your craftsmanship, ready for many conventions and photo shoots. Understanding how to clean, store, and address minor damages effectively is key to longevity.
Regular cleaning is fundamental. After each use, gently wipe down your armor with a soft, damp cloth to remove dust, sweat, and mild grime. For more stubborn marks, a very mild soap solution can be used, but always test it on an inconspicuous area first to ensure it doesn’t harm the paint or sealant. Avoid harsh chemicals or abrasive cleaners, as these can strip paint, dull finishes, or even degrade the Worbla itself. Ensure the armor is completely dry before storing to prevent mold or mildew growth, especially in any padded or fabric-lined areas.
addressing common armor damage
Even with careful handling, minor damage can occur. Knowing how to fix these issues can save your cosplay.
- Scratches and Scuffs: For minor surface scratches, a touch-up with matching paint and a small brush, followed by re-sealing the area, is often sufficient.
- Chipped Paint: Clean the chipped area, carefully re-apply primer if the Worbla is exposed, then repaint and re-seal.
- Cracks in Worbla: Small cracks can sometimes be repaired by carefully reheating the area with a heat gun (from a safe distance to avoid damaging paint) and gently pressing the edges together. For larger cracks, a patch of Worbla can be heated and molded over the crack, then primed and painted.
- Detached Details: Reattach with a strong adhesive like super glue or contact cement, ensuring the surfaces are clean and dry.
Proper storage is equally vital. Worbla armor, particularly large or intricately shaped pieces, should be stored in a way that prevents warping or crushing. Laying flat is often ideal for larger pieces, or hanging carefully structured pieces on padded hangers if their design allows. Avoid storing Worbla in extreme temperatures, as prolonged heat can cause it to soften and deform, while extreme cold can make it brittle. A climate-controlled environment, such as a closet or dedicated storage space, away from direct sunlight, is ideal.
When transporting your armor, invest in protective cases or bags. Padding delicate areas with foam or bubble wrap can prevent friction damage and impacts. Always disassemble parts that are meant to separate, to reduce stress on attachment points. By integrating these maintenance and repair practices into your cosplay routine, you not only extend the life of your Worbla creations but also maintain the high quality and intricate detail that you painstakingly achieved. It’s a testament to your dedication, ensuring your armor continues to impress for a long time.
innovations and trends in worbla crafting for 2025
The world of cosplay crafting is ever-evolving, and Worbla, as a versatile material, continues to be at the forefront of innovation. As we look towards 2025, new techniques, complementary materials, and community-driven advancements are pushing the boundaries of what’s possible with Worbla armor. Staying attuned to these trends not only keeps your skills sharp but also inspires new creative directions, allowing your cosplay to stand out in an increasingly sophisticated landscape. Technology and shared knowledge are key drivers of these exciting developments.
One significant trend is the integration of 3D printing with Worbla. Cosplayers are now designing intricate pieces in CAD software, 3D printing them, and then wrapping or detailing them with Worbla. This hybrid approach combines the precision and rapid prototyping capabilities of 3D printing with Worbla’s ability to create smooth surfaces, fill gaps, and add textural details that are difficult to achieve with printing alone. Furthermore, LED lighting and electronics are becoming more seamlessly incorporated into Worbla armor designs, with crafters finding creative ways to embed light strips and battery packs without compromising the armor’s structural integrity or aesthetic.
emerging techniques and materials
The future of Worbla crafting is bright, with new methods and synergistic materials continually emerging.
- Smart Worbla Adhesives: Development of specialized glues that bond Worbla to a wider range of materials, expanding design possibilities.
- Enhanced Heating Tools: More ergonomic and precise heat guns, potentially with integrated temperature feedback for optimal malleability.
- Eco-Friendly Worbla Alternatives: Growing interest in sustainable thermoplastic options that retain Worbla’s best qualities while being biodegradable.
Another area of growth is in the techniques for surface treatment and finishing. Beyond traditional painting, artists are exploring more advanced patinas, electroplating effects, and even fabric integration to create unique textures and appearances. Specialized paints that react to UV light or temperature changes are gaining traction, allowing for dynamic visual effects that can change during a convention. The community’s collective knowledge through online tutorials and workshops is rapidly accelerating the adoption of these advanced techniques.
The increasing availability of high-resolution references from games, movies, and comics also fuels the demand for hyper-realistic armor. Cosplayers are pushing for increasingly accurate details, intricate weathering, and perfectly matched textures, a challenge that Worbla, with its adaptability, is uniquely suited to meet. The drive for authenticity, combined with a willingness to experiment with new tools and methods, ensures that Worbla armor crafting in 2025 will be a vibrant and continually evolving art form. Keeping an eye on these innovations and trends will undoubtedly inspire and elevate your own cosplay masterworks.
| Key Point | Brief Description |
|---|---|
| 💡 Worbla Selection | Choosing the right Worbla type and thickness is crucial for project success and durability. |
| 🔥 Heat Forming Mastery | Precise heating and gentle manipulation create seamless, custom-fitted armor shapes. |
| 🎨 Painting & Detailing | Multi-layered paint applications transform Worbla into realistic wood, metal, or battle-damaged textures. |
| ✨ Durability & Care | Proper priming, sealing, and maintenance ensure your Worbla armor lasts for years. |
frequently asked questions about worbla armor
Worbla becomes self-adhesive when heated, thanks to a heat-activated resin. As it softens, the surface gets tacky, allowing pieces to stick to each other without additional glues. This property is crucial for layering, attaching details, and reinforcing seams, creating strong, permanent bonds. Always press fully heated pieces firmly together for the best adhesion.
Absolutely, Worbla works exceptionally well in combination with EVA foam. Foam can be used as a lightweight core for bulky armor pieces, providing structure while reducing the amount of Worbla needed. Worbla can then be heated and wrapped over the foam, adhering to its surface and adding durability, a smooth finish, and intricate details.
Store Worbla armor in a cool, dry, and climate-controlled environment, away from direct sunlight or extreme temperatures. Lay large pieces flat or hang well-structured items on padded hangers to prevent warping. Using protective cases or bags with soft padding during transport is also crucial to avoid scuffs and breaks, preserving your creation.
Sanding is highly important during the priming process. Worbla’s natural texture, especially Finest Art, needs to be smoothed to achieve a professional paint finish. Lightly sanding between multiple primer coats helps fill the grain and creates a perfectly even base. This ensures paint adheres better and prevents the Worbla texture from showing through the final layers.
Always work in a well-ventilated area to dissipate fumes from the heat gun and heated Worbla. Wear heat-resistant gloves to protect your hands from burns when manipulating the hot material. Use a heat gun with variable temperature control to avoid overheating the Worbla, which can cause bubbling or damage. Keep flammable materials away from your workspace for fire safety.
conclusion: forging your worbla legacy
Mastering Worbla armor is a journey of continuous learning, combining artistic vision with technical precision. From understanding the material’s fundamental properties to executing advanced heat forming and painting techniques, each step contributes to creating cosplay pieces that are not only visually stunning but also remarkably durable. This 2025 guide emphasizes the importance of meticulous preparation, strategic detailing, and thorough protection, ensuring that your armor stands out for its craftsmanship and longevity. By embracing these principles, you are well-equipped to forge a legacy of exceptional Worbla creations, bringing your imaginative designs to life with unparalleled skill and confidence, continually evolving with the material’s exciting potential.


