Master Advanced Cosplay Prop Painting: Metal & Weathering Effects
Advanced cosplay prop painting involves applying techniques to achieve realistic metal and weathering effects, enhancing the authenticity and visual appeal of costumes for dedicated cosplayers.
Achieving realism in cosplay props often comes down to the paint job. Advanced cosplay prop painting: achieving realistic metal and weathering effects can elevate your costume from amateur to award-winning. This guide explores techniques to make your props look like they’ve seen battles or forged in a dragon’s fire.
Understanding the Basics of Prop Painting
Before diving into advanced techniques, it’s crucial to solidify your understanding of the basics. A strong foundation in priming, base coating, and sealing is essential for achieving a professional finish. This will also ensure your advanced techniques have the best possible canvas to shine on.
Priming for Success
Priming is the unsung hero of prop painting. It creates a smooth, consistent surface for your paint to adhere to, preventing chipping and peeling down the line. Choosing the right primer depends on your prop’s material; for example, plastic props benefit from adhesion promoters.
Base Coating Techniques
The base coat sets the stage for your entire paint job. Aim for even coverage and consistent color to ensure your metal and weathering effects pop. Multiple thin coats are better than one thick one to avoid drips and unevenness.
- Thin Your Paints: Achieve a smoother finish by thinning your paints with appropriate mediums.
- Use Quality Brushes: Invest in good brushes for precise application and blending.
- Consider an Airbrush: For large props, an airbrush provides even coverage and smooth transitions.
Mastering the basics sets you up for success with advanced techniques. Understanding how your materials interact will give you the confidence to experiment and create truly unique props. With patience and practice, your prop painting skills will reach new heights.
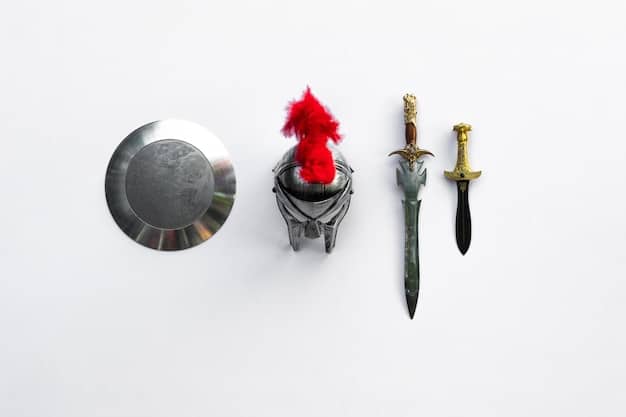
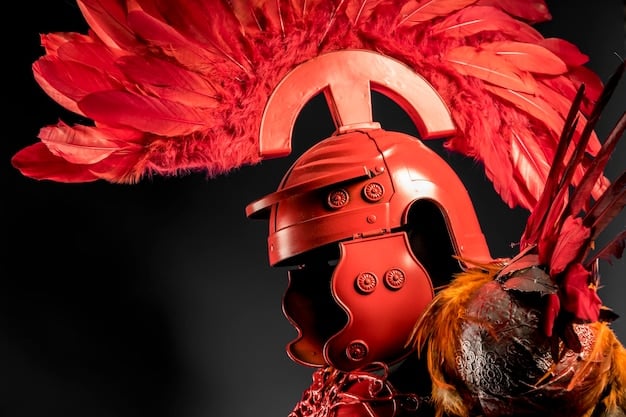
Creating Realistic Metal Effects
Metal effects can transform your props from plastic replicas into believable, battle-ready artifacts. There are several techniques to achieve realistic metal finishes, ranging from dry brushing to layering metallic paints. Experimentation is key to finding the approach that works best for you.
Dry Brushing for Highlights
Dry brushing involves applying a small amount of metallic paint to a dry brush and then lightly brushing it over the surface of your prop. This technique picks out edges and details, creating a convincing metallic sheen.
Layering Metallic Paints
Layering different shades of metallic paint adds depth and realism to your metal effects. Start with a darker shade as a base, then layer lighter shades on top to create highlights and shadows.
- Consider Different Metal Types: Research the specific type of metal you’re trying to replicate.
- Use Reference Images: Real metal textures and finishes can provides guidance.
- Experiment with Colors: Mix metallic paints with other colors to create unique tones.
Achieving realistic metal effects is a journey of experimentation. Each prop presents unique challenges and opportunities to refine your techniques. Don’t be afraid to try new approaches and push your creative boundaries. A little practice will bring fantastic results!
Achieving Authentic Weathering Effects
Weathering adds character and history to your props, making them look like they’ve survived harsh conditions or seen intense action. Techniques like washes, dry brushing, and texture application contribute to the impression of age and use.
Washes for Depth and Grime
Washes involve applying a thinned-down paint or ink to the surface of your prop, allowing it to settle into cracks and crevices. This creates depth and adds a sense of grime and age.
Dry Brushing for Wear and Tear
Dry brushing isn’t just for metal effects; it can also be used to simulate wear and tear. Apply a small amount of a lighter color to a dry brush and lightly brush it over edges and raised areas to create a worn appearance.
- Use Reference Photos: Pay attention to where wear and tear naturally occur on real-world objects.
- Consider Weathering Powders: These powders can add realistic rust, dirt, and dust effects.
- Apply Weathering Sparingly: Over-weathering can detract from the realism of your prop.
Mastering weathering techniques adds a new level of storytelling to your cosplay props. Consider the history of the item you are building. Apply your weathering techniques in a way that creates a convincing narrative. The time you invest in these techniques will give you fantastic results.
Combining Metal and Weathering Techniques
The true magic happens when you combine metal and weathering techniques. Layering these effects creates props that are not only visually stunning but also tell a compelling story. This is where you can begin to show your creativity!
Creating a Battle-Worn Sword
Start with a base coat of metallic paint, then apply washes to simulate grime and rust. Use dry brushing to highlight edges and create a worn appearance. Consider adding texture with a sponge or stippling brush to simulate dents and scratches.
Aging a Sci-Fi Blaster
Use a combination of metallic paints and weathering powders to create a realistic sci-fi blaster. Apply washes to add depth and grime, then use dry brushing to highlight edges and create a worn appearance. Consider adding battle damage with a heat gun or soldering iron.
- Plan Your Approach: Visualize the finished prop before you start painting.
- Use Stencils: Stencils can add intricate details and weathering effects.
- Be Patient: Layering effects take time and patience, but the results are worth it.
Combining metal and weathering techniques elevates your prop painting to an art form. By thinking narratively about the history of your prop, you can create a believable and captivating look. This method will help you create incredible props that will amaze everyone!
Advanced Materials and Tools
As you progress in prop painting, you’ll want to explore advanced materials and tools. These can elevate your work and allow you to achieve even more realistic and nuanced effects. This will open possibilities in creating unique techniques of cosplay art!
Epoxy Resins for Durability
Epoxy resins create a hard, durable coating that helps protect your paint job and add structural integrity to your props. They’re ideal for props that will be handled frequently or subjected to harsh conditions.
Airbrushes for Precision
Airbrushes offer superior control and precision compared to traditional brushes. They’re ideal for creating smooth gradients, intricate details, and seamless weathering effects.
- Explore Specialty Paints: Experiment with color-shifting paints, glow-in-the-dark paints, and other unique finishes.
- Invest in Quality Tools: High-quality brushes, airbrushes, and other tools can make a significant difference in your results.
- Attend Workshops and Seminars: Learn from experienced prop painters and expand your knowledge.
Exploring advanced materials and tools can open up a whole new world of possibilities for your prop painting. Experimenting with these new resources is exciting and will further develop creative abilities. Each new technique empowers you to create ever more incredible work!
Sealing and Protecting Your Work
Sealing your finished prop is crucial for protecting your hard work. A good sealant will prevent chipping, scratching, and fading, ensuring your paint job lasts for years to come. This is the final step, making sure your art is ready to display.
Choosing the Right Sealant
There are various types of sealants available, each with its own strengths and weaknesses. Acrylic sealants and lacquer sealants are the most commonly used.
Application Techniques
Apply sealant in thin, even coats to avoid drips and unevenness. Allow each coat to dry completely before applying the next. Multiple thin coats are better than one thick one. This will give your seal a flawless finish.
- Consider UV Protection: Choose a sealant with UV protection to prevent fading.
- Test Your Sealant: Test the sealant on a small, inconspicuous area before applying it to the entire prop.
- Allow for Proper Curing: Follow the manufacturer’s instructions for curing time.
Sealing your prop is the final step in the painting process. Investing time and effort into protecting your work guarantees it will endure. The final sealant protects your investment in time and artistry, displaying a preserved masterpiece.
| Key Element | Brief Description |
|---|---|
| 🎨 Priming | Creating a smooth, consistent surface for paint adhesion. |
| ⚙️ Metal Effects | Using techniques like dry brushing and layering to simulate metal. |
| 🌧️ Weathering | Adding depth using washes and dry brushing to create age. |
| 🛡️ Sealing | Protecting the finished paint job with a sealant. |
Frequently Asked Questions
For plastic props, it’s best to use a primer designed specifically for plastics. These primers often contain adhesion promoters that help the paint grip onto the slick surface, preventing chipping.
To tone down the shine of metallic paint, try layering it with a matte sealant or mixing it with a small amount of a non-metallic color. This can help create a more realistic and subdued metal effect.
One common mistake is over-weathering, which can detract from realism. Also, not using reference photos. Applying weathering in areas where. Applying weathering in areas where it wouldn’t naturally occur can diminish the effect.. Consider your technique and the setting of your prop!
Yes, many household items can be used for this. Salt can create a chipping effect, and sponges can add texture. Experiment, but consider the chemicals involved and ventilation!
Sealing is crucial. It protects the paint job from scratches, chips, and UV damage, ensuring your prop looks great for a long time. Proper sealing can really extend the life of your prop!
Conclusion
Mastering advanced cosplay prop painting techniques opens a new world of creativity and realism. With practice and attention to detail, you can transform ordinary materials into extraordinary works of art, bringing your cosplay visions to life. Continue experimenting, learning, and refining your skills to create truly stunning props.


